Sunday, October 22, 2017

Fold down rear seat

One of the most attracting details in early fastback Mustangs is the fold down rear seat. Before that I knew this feature even existed I often wondered why some of the Mustangs had that MUSTANG 2+2 emblem in the lower corner of the front fenders while the others did not. The fact is that the rear seat of a fastback is uncomfortable and not too inviting to sit on as a passenger, it looks extremely good. In my opinion it looks even better unfolded. While still having my car at the painter's shop I have my garage 'empty' for restoring the set of seats and painting the hardware. I had purchased another set of interior earlier so I had everything in double and I was able to choose which to use for my build. The fold down consists of three major parts i.e. 1) the backrest support which is connected to 2) L-shaped part and 3) the flat rear part. I decided to use the parts from the purchased set as their trim was in better condition. I started with steel wool cleaning the trim before unscrewing.


All the hardware parts got some fresh paint on them. These will not be visible but as I had some signal red left available I used it. I made an order to NPD for the interior stuff and had them at my door eight days later. When compared to the carpet and seat covers the signal red appeared too orange, so for the areas where the color can be seen, like in the L-shaped part, I went with semi-matt Ruby Red (RAL3003) which gives a better match. I am not sure what color there should be used in the hinges, but I painted them black as well as the frame of the backrest. 

Ruby red test piece with backrest vinyl

Along with the NDP delivery came the carpets which were glued to the surface using sprayable glue. After the glue got dried the excess of the material was trimmed with a knife. The trim was handled with steel wool and polished. Not a perfect end result, but I do not want to buy a repro kit which is available but rather expensive. 


The pitted rear trim at trap door latch area

The flat part

Backrest support

L-shaped part

On the right the original from my car

Mated with piano hinge


The backrest stuffed part was the next one. I cut the hog rings, removed the vinyl surface, cleaned the netted frame and painted it black.  The old foam was in decent condition, no mildew, and needed only to be vacuumed. The foam was set under the frame and together they went inside the edges of the new cover. I started hog ringing from the top edge center to make the best fit on the visible area, the repeated the same on the bottom edge and the sides were done the last.

Foam dated 10/1/64

Inserting listing rod

Frame and foam slipped in the cover

First hog rings to the top center

Moving towards the sides

The bottom edge with channel and listing rod

The support ready for hinges and padding

The hinge

Top side mounts to hooks and bottom is secured with 2 screws

Folded down - looks nice

Now, this was probably the easiest part of the interior renovation. We'll see how difficult it will be with the seat. After that I'll decide if I'll continue with the front seats or shall I turn to use help of a professional.

Funny details

It looks like Ford did some production changes during the same model year. My car being from early October 1964 production and the donor car from which I purchased the interior parts is most likely 'true' '65. Here are the same trim parts from the side of L-shaped part. Note the improved design. The parts are not interchangeable, unless changing them all.

'64 type trim on the left


It's hard to figure out what Ford had in mind when they decided that the bumper stop bracket shall be attached with machine screws on one side and with the sheet metal screws on the other. 


The whole fold down system including the flat part weighs a lot, altogether 26,5 kg.

Tuesday, August 8, 2017

Off to bodywork

For some reason the reconditioning stopped in spring due to busy times in work and home. Since March I've spent very little time in the shop, mostly just cleaning , fixing and painting smaller parts and packing them for future use. More of these when it is time to install them. The hood, fenders and valance panels were finally installed after they had been painted on the inside. It is no use proceeding with installing more parts until the car has been painted and I do not have the necessary skills to finalize the bodywork. Obviously some one has been jumping on the roof which has left dents and humps on the roof metal. This kind of metal straightening is better to leave for someone who is more experienced. I had met a guy who has a shop nearby and offered to do the prepping. I contacted him in early summer again and we agreed the pricing and scheduled the car to be delivered in August, after we've had our vacations. And here we go.


Once the fitting and prepping is finished the hood, deck lid and doors will be detached for painting.
I must admit that the bad experiences I have with choosing a wrong guy to do the job for Destiny came in my mind. We'll see how it goes this time.


Wednesday, February 8, 2017

Rear Brakes

The car left the factory with drum brakes in every corner and non-boosted single bowl master cylinder, just like so many of it's siblings. The drum brakes are fine in normal operation, but for more serious braking front discs would add stopping performance. A brake booster will make the operation nicer and the dual line system would add safety. Due to the condition of the old brake tubes, flexible hoses and master cylinder the decision is easy to make for rebuilding the brakes from the beginning. 

I want to reserve the option to use Ford's 14" rims which narrows the options for front discs and calipers and when a minimum amount of modification is wanted the options to find suitable master cylinders + boosters with dual lines are even fewer, especially when the use of original type z-bar clutch link rods shall be used. Browsing the discussion threads over the topic told me that the one available from NPD is the only one that bolts to the original pedal assembly and fits between the firewall and shock tower and the only modification is to make a minor notch in the export brace.

My plan for brake system consists of


REAR BRAKES


To get started with the plan the rear brakes and parking brake got installed. Some stuff was ordered from NPD and the shoes, wheel cylinders and hardware was purchased from US Parts and the rest of hardware were cleaned.


Raybestos PG151 and hardware
Wheel cylinder WC36020 is for passenger side
WC36019 for driver side attached.
Self-adjust wire hanging loose
The parking brake equalizer rod  is universal for both sides. 
Equalizer rod slid in
New Scott Drake parking brake cable
Self-adjustment mechanism

PARKING BRAKES


The lever was cleaned and painted. The front parking brake cable was shot and so was the parking brake lever handle so new ones were ordered. The Scott Drake cable looked fine but the same can not be said about the handle (# 2760-1 , Made in Taiwan). The new one does not look the same, it is not curved as the original and the hole for locking pin is drilled in the wrong angle so the handle would hang looking stupid. Therefore a new hole needed to be drilled to make this inexpensive piece acceptable for installation. 

Parking brake lever waiting for installation

This is the rattling latch that needs to be released...
...to be able to install the ball end of the cable

The pulley, pin and clip

The old and the new handle
Note the position of the locking pin hole

Now the parking brake actuator assembly can be installed under the dash. (ironically I do not have a picture of this phase at hand right now), the front cable brackets can be secured to the firewall and to transmission tunnel cross member. The transmission support cross member needs to be installed in order to go further under the car.

Rear cable to bracket
Cable support at the outer side of rear frame rail
The equalizer lever, rod and bracket
Equalized spring attached to frame rail
The rims were painted to finish the install

OK. Basically the car now has parking brake working. The adjustment and use of the brakes will only happen when I am finished with master cylinder, hard lines, flexible lines and front brakes and bleeding. 


Friday, January 13, 2017

Heater Box

This is the heater box after being pulled from under the dashboard. The heater blower motor had the following code and date marking

Blower motor C0DF-18527-A
Date OCT 6 1964


The plenum practically crushed when touched. This is factory installed cardboard type plenum. The core has been repaired or replaced, obviously by Dota Bros Service Station, Wilbur Avenue, Phillipsburg, NewJersey (childhood home town of Jayne Mansfield). The core seems to be good so thanks for a job well done, Bros!


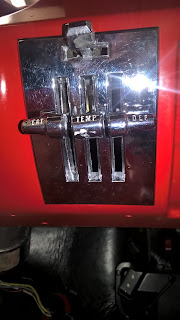
The core seemed to be in good shape but otherwise the box was very dirty and all the gaskets were eroded. The box (which is surprisingly expensive as a reproduction) also needed some glass-fiber patching and new hinges for the fresh air door. Once painted it was set aside for a while until my order for NPD included the necessary parts to fulfill the reconditioning. The heater operating panel got some cleaning, lubrication and polishing and here are the final results.


It's been three years passing since I bought this car. It seems like the restoration will take more time, effort than what I expected back then. So far I have been able to mostly restore it with the parts supplied along with the vehicle or parts obtained from local resellers. A couple of weeks ago I placed my first order to NPD because I needed parts that were not available off the shelf from any local. But now I have done all that can be done without buying more and more parts. The big spending is needed for motor, interior and the paint job. 

As the USD is strong against EUR the prices are now higher to me that during the restoration of Destiny some 8 years ago. With the latest order, including UPS freight costs, customs and taxes, the final price for the delivery is 1.5 times the USD price in EUR, This means that an order of goods worth $1000 in the NPD catalogue will cost me €1500 delivered to my door. It is crazy but the local sellers tend to have 1.6 - 1.8 times the pricing. So it is cheaper to place a direct order and it is fun to track the packages as well. Here is the latest route from NPD to me.